Monster High – Draculaura Tutorial
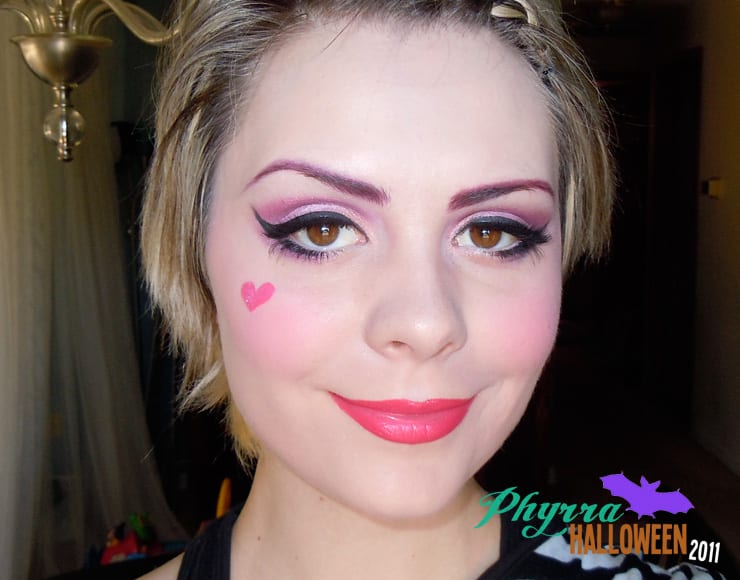
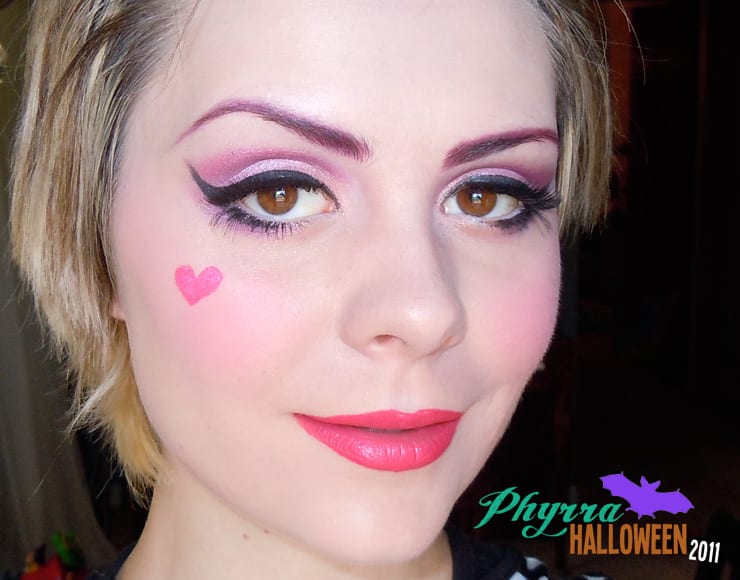
Today I have a guest post for you from the pretty Erin of the Pretty Exclusive! I asked her if she would do some cute Monster High looks for Halloween! Her first look was Cleo de Nile. Today’s look is my personal favorite, Draculaura. Draculaura is the daughter of Dracula. Her BFF (Bat Friend Forever) is Count Fabulous. She’s a vegan vampire, so she only consumes fruits, vegetables and iron suppliments.
What You’ll Need… The products I used are listed below in the order listed here.
• A foundation slightly lighter than your skin tone
• Setting powder
• Concealer
• Bright pink blush
• Eyeshadow primer
• A light peach eyeshadow
• A bright pink eyeshadow
• A frosty mid-tone pink eyeshadow
• A rich raspberry eyeshadow
• An eyeshadow slightly lighter than your skin tone
• A gel or pen eyeliner
• A matte black eyeshadow
• White pencil eyeliner
• Volumizing mascara
• False eyelashes (strips & individuals)
• Lash glue
• Bright red lip liner
• Bright pink lipstick
• White concealer
• Sticky post-it label
• Scissors
• Angled eyeliner brush
• Mid-sized paddle shaped brush
• Fluffy blending brush
• Powder brush
• Flat top or stippling brush
Step-by-Step Guide
Let’s start with the face!
It’s always nice to start with an even base so let’s delve into the facial makeup before we tackle the eyes.
Using a stippling or flat topped brush (I used a Sonia Kashuk flat top brush), apply a foundation slightly lighter than your natural skin tone to your face. Tapping the stippling brush all over your face to apply the foundation then blending it in a circular motion creates a more even, airbrushed look. If you’d like, you can add a little pink mineral blush or eyeshadow to tint it slightly (as Draculaura has pink tinged skin) but you don’t have to. Follow up this step by concealing any blemishes or under eye circles with concealer then set it all by dusting a translucent powder all over your face.
To give a healthy ‘undead’ flush to your skin, apply a vibrant pink blush to the apples of your cheeks. You want to keep it sweet and almost natural so don’t bring the color up along your cheek bone or in the hallows of your cheeks. With my fingers I dabbed on and blended in MAC Cosmetics’ Creme Blush in ‘Tickled Pink.’
Now for the eyes!
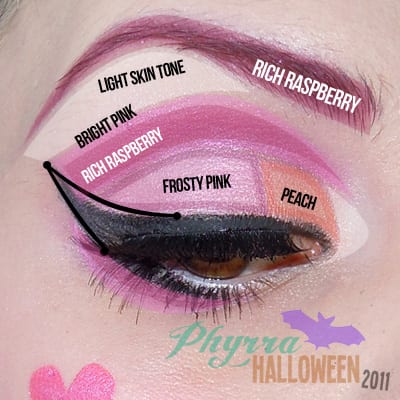
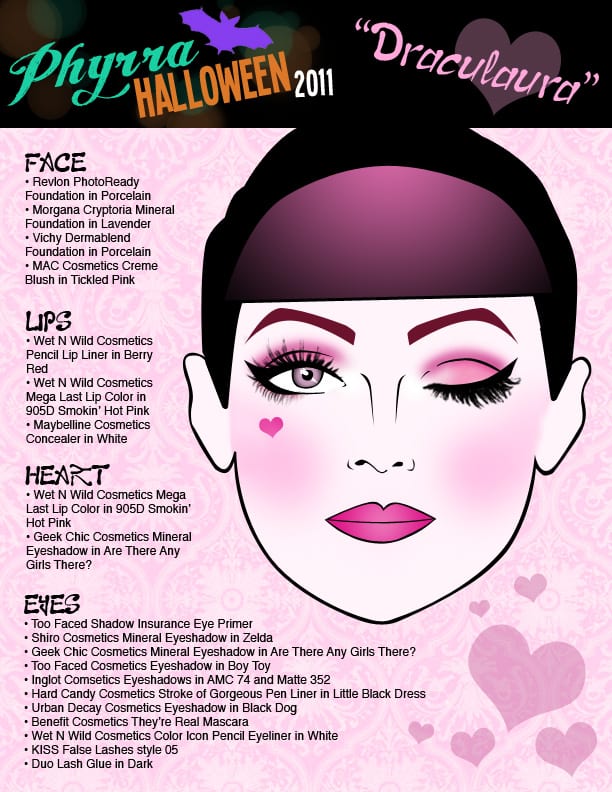
If you have trouble following these directions, use the eye image below for reference.
First, before we apply any eyeshadow, you want to fill in your brows with the rich raspberry color using a thin angled brush. I used Inglot Cosmetics’ Eyeshadow in AMC 74. You want the arch to be very angled and to draw out the out line slightly past the end of your brow. These two additions will give a dramatic flare to your face.
Time for eyeshadow! Apply your favorite eye shadow primer all over your lids and a little under your eyes. When that has dried or set slightly, take your light peach eyeshadow (I used Shiro Cosmetics’ Mineral Eyeshadow in ‘Zelda’), load it onto your mid-sized paddle shaped brush and pat it on to the inner part of your lids. You want to start in the inner corner and bring the color a third of the way across your lid.
Next, using the same brush (you want to clean off the eyeshadow before on a piece of tissue) take a frosty mid-tone pink eyeshadow (I used Too Faced Cosmetics’ Eyeshadow in ‘Boy Toy’) and pat it on to the other two thirds of your lids. Make sure to keep the color below the crease and only slightly beyond the outer part of your eye. Using the same brush, gently blend the peach and the pink color together. If you loose any of the peach color in this process, just add a little more to build it up again.
To brighten your eyes a bit, next apply an eyeshadow slightly lighter than your skin tone to your brow bone and a little in the inner corner of your eye. I used Inglot’s Matte 352 eyeshadow.
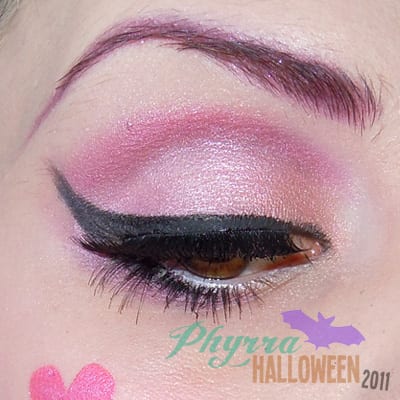
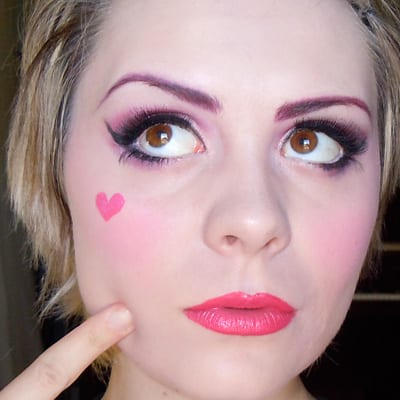
Time for the crease! First, using only the tip of the paddle brush, load up your bright pink eyeshadow color. I used Geek Chic Cosmetics’ Mineral Eyeshadow in ‘Are There Any Girls There?’. Then, slowly press the color into a line in your crease, bringing the color out past the outer corner of your eye. You want the end of the crease line to about where the curve of your eyebrow ends. Using a fluffy blending brush, blend the color slightly to fade it into the other colors. Brush a little of this color under your lower lash line as well. Next, over top the bright pink, apply the raspberry color in a similar fashion; press it into the line of your crease, dusting a fluffy brush over top to blend the colors together. You want a obvious but blended line in your crease. Also blend a little of this color into the pink under your lash line.
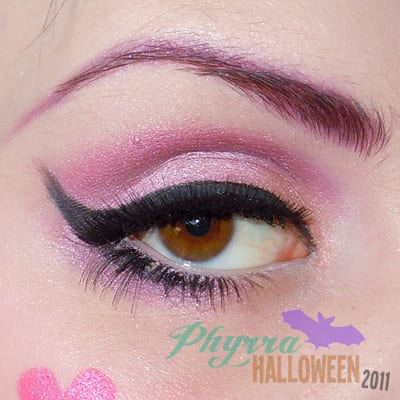
Time to line! A good pen like eyeliner is a must have for this look but a gel liner and a thin angled brush can be used too. I used Hard Candy Cosmetics’ Stroke of Gorgeous Eyeliner in ‘Little Black Dress.’ First, start by dotting a small dot slightly above your crease at about a 45 degree angle from the outer corner of your eye. Next, line your upper lash line as usual, keeping the line tight to your lashes. Then, from the end of that line on the outer corner, connect to the dots with a straight (or as straight as you can) line. Thicken up the original line along your lashes and then mid way across your eye, angle that line to connect up with the dot as well. This should create a little triangle on the outer part of your eye. Fill that in with the liner, bringing the tip (where the dot was) to a sharp point. Also line your lower lash line but make sure to keep the color under your lashes, not on your waterline, and only bring the color to two thirds of the way across your eye. A good guide is to stop the black liner when your lower eyelashes peter out. To darken the liner further and sharpen up the edges, apply a super black matte eyeshadow over top with a thin angled brush. I use Urban Decay Cosmetics’ Eyeshadow in ‘Black Dog.’ Finally, line your waterline with a white eyeliner pencil to make your eyes look bigger and brighter. I used Wet N Wild Cosmetics’ Color Icon Pencil Eyeliner in ‘White.’
Time for the lashes! First, apply at least three of coats of a volumizing mascara to your upper lashes. I used Benefit Cosmetics’ They’re Real! Mascara. Next, apply the mascara to the outer part of your lower lashes only. This will open up your eyes even more, making them look even bigger. After the mascara has dried, apply dense, black false lashes to your upper lash line. I used KISS Falsh Lashes in ‘05’. A tip when applying falsies is to let the glue sit for about 45 seconds. This lets the it get tacky and less likely to slip when you actually apply them. Then, to really make your eye’s doll like, apply two false individual lashes to the outer part of your lower lash line.
Let’s color those lips!
With the eyes finished, it’s time to wrap things up by applying your lip color. Take your bright red lip liner and line your lips, fudging the line out a little to make your lips look bigger. I used Wet N Wild Cosmetics’ Lip Liner in Berry Red. Now, straight from the bullet, fill in your lips with your almost hot pink lipstick. I used Wet N Wild Cosmetics’ Mega Last Lip Color in ‘905D Smokin’ Hot Pink.’ To make an even poutier pout, finish up your lips buy applying a little white concealer to the center of your lips. This light color in contrast with the hot pink gives your lips dimension, thus making them look that much bigger.
Finally, the heart!
For the pièce de résistance, Draculaura’s signature heart and a really easy trick to get the perfect shape. First get a sticky post-it, either a normal one or the new label post-its that are sticky all over their back. Fold the post-it in half gently. You don’t want to crease the paper much, or stick the sides together, so don’t press it together hard. Next, take some scissors and cut a half heart shape along the folded crease. When you open up the post-it you instantly have the perfect heart! Next, place the paper onto your cheek near your eye. I believe Ula has the heart on the left side, and yes, I know mine accidently ended up on my right, but you can do either! It’s your look do what you’d like! 🙂 Anyway, place the paper against your skin, holding it in place if the back isn’t sticky all over. Then, using your middle finger to pat it on, apply some of your hot pink lipstick over heart like a stencil! When you have an even, opaque color, dip or rub your pointer finger into the bright pink eyeshadow (I used Geek Chic’s ‘Are There Any Girls There?’) and pat that onto the heart as well. The powder will set the cream lipstick and keep the heart from smudging or fading.
And that’s it! Put on the rest of your sweetly goth Draculaura garb on and enjoy all Hallow’s Eve in true Monster High style!
Products I Used
On my face…
• Revlon PhotoReady Foundation in Porcelain
• Morgana Cryptoria Mineral Foundation in Lavender
• Vichy Dermablend Foundation in Porcelain
• MAC Cosmetics Creme Blush in Tickled Pink
On my eyes…
• Too Faced Shadow Insurance
• Shiro Cosmetics Mineral Eyeshadow in Zelda
• Geek Chic Cosmetics Mineral Eyeshadow in Are There Any Girls There?
• Too Faced Cosmetics Eyeshadow in Boy Toy
• Inglot Comsetics Eyeshadows in AMC 74 and Matte 352
• Hard Candy Cosmetics Stroke of Gorgeous Pen Liner in Little Black Dress
• Urban Decay Cosmetics Eyeshadow in Black Dog (From their Black Palette)
• Benefit Cosmetics They’re Real Mascara
• Wet N Wild Cosmetics Color Icon Pencil Eyeliner in White
• KISS False Lashes style 05
• Duo Lash Glue in Dark
On my lips…
• Wet N Wild Cosmetics Pencil Lip Liner in Berry Red
• Wet N Wild Cosmetics Mega Last Lip Color in 905D Smokin’ Hot Pink
• Maybelline Cosmetics Concealer in White
For the heart…
• Wet N Wild Cosmetics Mega Last Lip Color in 905D Smokin’ Hot Pink
• Geek Chic Cosmetics Mineral Eyeshadow in Are There Any Girls There?

I love to see how the eyeshadows are broken down and I love this look!
Yay! I’m glad you do 🙂
Wow again! Looking forward to see the rest of MH look 🙂
Glad you like it Stella 🙂
Part of me loves the Monster High dolls b/c they’re adorable, and part of me is disappointed that Mattel didn’t push the envelope past B-movie effects applied to still anatomically disproportionate and, generally, vapid girls.
Agreed about loving the eye diagram, though!
Not sure if you’ve read any of the MH books but I did end up picking up the first one out of curiosity and it seems to be about people fitting in even though they’re different. I know what you mean though!
BEAUTIFUL! I love this ~ hopefully I’ll get to cosplay as Draculaura one day, and I’ll be sure to use this as my makeup tutorial!
Aww, that would be so cute!
I was waiting to see this one. 🙂 Draculaura is by far my favorite, pink, vegan and fangtastic! I also love Operetta. Very cute! (Where were these when we were little?)
I know! I wish these had been around!
Oh please keep these coming! I LOVE the monster high dolls! And these tutorials are extremely helpful to a few cosplayers I know 😉
Will do! Miss you! *hug*
It’s great to see a breakdown of how eyeshadow is applied — not just for Halloween but for all the time! I’ve been wearing a lighter shade in the inside corner and a darker shade on the outside corner, but I haven’t used a seperate shade for the crease. I’m going to reference this “diagram,” so to speak, next time I apply eyeliner!
Yay! I’m so glad it’s helpful 🙂