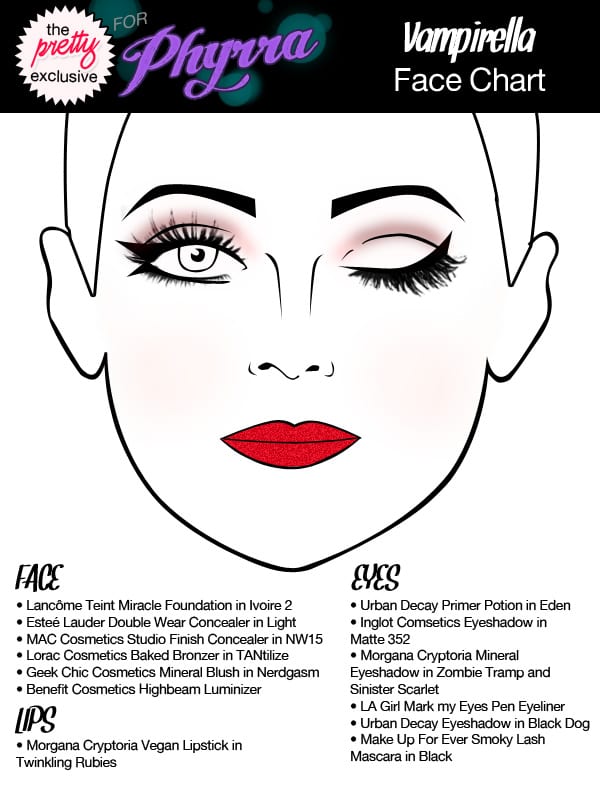
Vampirella Step-by-step Look
Today’s post is a guest post with the lovely Erin from The Pretty Exclusive! She did a fantastic step-by-step on her Vampirella Look, based on one of my all-time favorite vampire characters.
~
So, were you wondering how I did the liner in the Vampirella Look a
few weeks back? You were? Awesome. And I’ll let you in on a little
secret, it was easier than you’d think. Thanks to a few tricks of the
trade you too can get winged out vampire eyes with this new step by
step guide! Lets get started!

Step 1
Apply primer all over your lid and underneath your lower lash line.
Step 2
Apply a light pink/skin tone eyeshadow all over your lid. Make sure to
bring the color all the way up to your brow bone and in the inner
corner of your eye. I used Inglot Cosmetics Eyeshadow in Matte 352.
Step 3
Apply a line of black/very dark red eyeshadow to your crease with the
tip of a paddle shaped brush. A cut crease is very dramatic but you
don’t want it to overshadow the liner, so blend, blend, blend. You
want a strong line but a faded wash of color. I went back at least
three times, adding and blending, until I got a nice faded black
color. Make sure to blend it out past the outer corner of your eye as
it will eventually connect up with the liner. I used Morgana Cryptoria
Mineral Eyeshadow in Zombie Tramp.
Step 4
Apply a bright red eyeshadow to the crease with the same paddle brush.
You want to layer this color over the black and blend the two together
with a fluffier brush. However, with the red shadow, add a bit more
towards the inner corner of your eye and blend down. It should look
like the cut crease fades from red to black/red. I used Morgana
Cryptoria Mineral Eyeshadow in Sinister Scarlet.
Step 5
Time for the liner! Here is one of the little tricks I was talking
about. First, using a gel liner and a thin liner brush OR a marker
liner (which is what I used; LA Girl Mark My Eyes Pen Liner, to be
exact), make to dots on the outer corner of your eye. The first one
should be up in your crease towards the edge of the shadow in your
crease. The second should be at about a 45 degree angle below the
outer corner of your eye.
Then, using the same marker or gel liner, connect the dots with the
outer corner of your eye. Using the picture above as a guide, connect
A to C and then connect B to C. It should end up looking like this:
Step 6
Time for the sharp upper flick. First, start again by making a little
dot with your liner, but this time put it almost half way across your
upper lid.
Then draw a line (carefully) by connecting A to B and fill in the
space between. It should look kinda like a long triangle:
Step 7
To finish up the liner, first finish up the upper liner by connecting
the edge of the triangle on your lid with the inner corner of your
eye; connect A to B.
Next, going back to the lower line we drew earlier, create another
little triangle by connecting C to D. You can add another dot for D if
you’d like (I forgot), but you want it to be about a third of the way
along your lower lash line. Then fill in that shape.
To finish of the liner, using the same liner as before, draw a line
along your lower lash line from D to E. You don’t want to follow, or
tightline, your lower lashes the whole way. For a guide, just before
your lower lashes end, continue the liner in a straight line for a
couple centimeters. But make sure you don’t connect it with the inner
corner of your eyes. When you’re all done it should look something
like this:
Step 8
Time to clean up those lines! As you can see above, the edges of the
outer liner aren’t perfect. So to make those lines super straight,
here is another must know trick. First, dip a pointed or regular
cotton swab into some makeup remover. Squeeze out any extra (you just
need it a little damp). Then, with a steady hand, drag the swab along
the edge of the liner to adjust the line. Don’t worry if you take off
a little too much, you can just reapply and adjust again. Here is a
picture of the cleaned up line; if you compare it to the one above,
you’ll see what I did. I also used a little matte black eyeshadow
(Urban Decay Eyeshadow in Black Dog) to set the liner and define the
lines.
Step 9
To finish up, line your water line til you reach the end of your
lasheswith a black eyeliner pencil (I used a Prestige Eyeliner) and
pack on three layers of mascara (I used Make Up For Ever Smoky Lash
Mascara in Black).


I love it! I love Vampirella and have read a TON of the series. Ahhh now I can look a bit like her too – thanks!!!
This is SO awesome!!
this is so pretty! love it!
Thanks for a great tutorial! 🙂
Fantastic tutorial, thanks so much! I love the lower liner 🙂
This is GORGEOUS! I love the trick for making the perfect cateye. Thanks!